Raspberry Pi
RDK-V
Overview
Raspberry PI(RPI) for RDK-V supports Morty and Dunfell Builds. Variety of Images based on requirement can be build for RPI such as Media Client, Media Gateway hybrid, and IP Client STB. And the supported device versions of RPI for RDK Stack are Raspberry Pi 3B,Raspberry Pi 3B+, and Raspberry Pi 4B.
How to build
Information/steps specific to yocto 2.2 Morty and yocto 3.1 Dunfell is explicitly mentioned; otherwise, same steps for both versions.
Setting up the Host Environment:
Pre-Requisites
|
Requirement |
Yocto 2.2 (Morty) |
Yocto 3.1 LTS (Dunfell) |
|---|---|---|
|
Linux |
32/64 bit Ubuntu 16.04 LTS Precise supported distributions and versions are here |
64 bit Ubuntu 18.04 LTS Precise supported distributions and versions are here |
|
Free HDD Space |
Minimum 100GB Free Memory |
Minimum 100GB Free memory space |
|
Oracle Virtual Box |
5.0.40 or higher |
– |
|
Wireless Adapter |
Brand Name: Tenda ralink & Model Number:W311MI TP-Link Archer T4U AC 1200 |
– |
|
USB to Ethernet Switch |
To connect with Ethernet Switch & Multiple Clients |
|
| Host Tools version |
|
|
Install the following packages for setting up your host VM
The instructions provided below are meant to be executed via the command line on an Ubuntu machine
# essential packages installation
# super user mode is required

# major essential packages
sudo apt-get install gawk wget git-core diffstat unzip texinfo gcc-multilib g++-multilib build-essential chrpath socat bison curl
# supportive packages
sudo apt-get install libfile-slurp-perl libncurses-dev autoconf flex doxygen libtool automake libpcre3-dev zlib1g-dev libbz2-dev subversion minicom putty libssl-dev rpm python-pexpect python-svn python-argparse vim tofrodos meld dos2unix cmake uuid-dev ruby transfig libglib2.0-dev xutils-dev lynx-cur gperf autopoint python-dulwich python-dev openjdk-7-jre
Note : Please note openjdk-7-jre package is not available for Ubuntu-16.04 anymore. Presumably openjdk-8-jre should be used instead.
# essential packages installation
# super user mode is required

# major essential packages
sudo apt-get install gawk wget git-core diffstat unzip texinfo gcc-multilib g++-multilib build-essential chrpath socat bison curl cpio python3 python3-pip python3-pexpect xz-utils debianutils iputils-ping python3-git python3-jinja2 libegl1-mesa libsdl1.2-dev pylint3 xterm
Configure bash as default command interpreter for shell scripts
sudo dpkg-reconfigure dash
Select “No”
To choose bash, when the prompt asks if you want to use dash as the default system shell – select “No”
Configure Git
Upgrade your Git version to 1.8.x or higher
On Ubuntu 16.04 LTS, if you are unable to upgrade your git version using apt-get, then follow the below steps in order to upgrade
sudo apt-get install software-properties-common
sudo add-apt-repository ppa:git-core/ppa
sudo apt-get update
sudo apt-get install git
Once git is installed, configure your name and email using the below commands
# review your existing configuration
git config --list --show-origin

# configure user name and email address
git config --global user.name "John Doe"
git config --global user.email johndoe@example.com

# configure git cookies. Needed for Gerrit to only contact the LDAP backend once.
git config --global http.cookieFile /tmp/gitcookie.txt
git config --global http.saveCookies true
Configure repo
In order to use Yocto build system, first you need to make sure that repo is properly installed on the machine:
# create a bin directory
mkdir ~/bin
export PATH=~/bin:$PATH

# Download the repo tool and ensure that it is executable
curl http://commondatastorage.googleapis.com/git-repo-downloads/repo > ~/bin/repo
chmod a+x ~/bin/repo
Credential configuration
Note: it is also recommended to put credentials in .netrc when interacting with the repo.
A sample .netrc file is illustrated below
|
machine code.rdkcentral.com login <YOUR_USERNAME> password <YOUR_PASSWORD> |
|---|
Yocto 2.2 – Morty’s build environment and image build steps
All RPi based RDK images with the latest features are from the rdk-next branch.
Initializing the Build Environment
To build RDK images from rdk-next branch, follow the below build procedure
mkdir <workspace directory>
cd <workspace directory>

# initialize the manifest with repo tool

#For 'generic build'
repo init -u https://code.rdkcentral.com/r/manifests -b rdk-next -m rdkv-nosrc.xml

# For 'IP Client STB' build
repo init -u https://code.rdkcentral.com/r/rdkcmf/manifests -b rdk-next -m rdkv-extsrc.xml

repo sync -j `nproc` --no-clone-bundle --no-tags
Image build
Link to check possible RDK images on RPi – https://code.rdkcentral.com/r/plugins/gitiles/components/generic/rdk-oe/meta-cmf-raspberrypi/+/refs/heads/rdk-next/recipes-core/images/ -RDK-V
Media Client
MACHINE=raspberrypi-rdk-mc source meta-cmf-raspberrypi/setup-environment
# both rdk-generic-mediaclient-image and rdk-generic-mediaclient-wpe-image are same now
bitbake rdk-generic-mediaclient-image
Media Gateway (Hybrid)
MACHINE=raspberrypi-rdk-hybrid source meta-cmf-raspberrypi/setup-environment

#both rdk-generic-hybrid-image and rdk-generic-hybrid-wpe-image are same now
bitbake rdk-generic-hybrid-image
IP Client STB
MACHINE=raspberrypi-rdk-ipmc source meta-cmf-raspberrypi/setup-environment

bitbake rdk-generic-ipclient-image
The Kernel image and root file-system collectively created as an image and it will be available under build-<MACHINE>/tmp/deploy/images/<MACHINE> folder.
Yocto 3.1 – Dunfell‘s build environment and image build steps
Initializing the Build Environment
For Media Client,Hybrid Gateway,Hybrid Gateway with operator Ref.App, and Client STB follow below commands
mkdir <workspace directory>
cd <workspace directory>
#for Media Client,Hybrid Gateway, and Hybrid Gateway with operator Ref.App follow below repo init command
repo init -u https://code.rdkcentral.com/r/manifests -b dunfell -m rdkv-nosrc.xml
#for Client STB follow below repo init command
repo init -u https://code.rdkcentral.com/r/rdkcmf/manifests -b dunfell -m rdkv-extsrc.xml
repo sync -j `nproc` --no-clone-bundle --no-tags
Image build
Media Client
MACHINE=raspberrypi-rdk-mc source meta-cmf-raspberrypi/setup-environment
bitbake rdk-generic-mediaclient-wpe-image
Hybrid Gateway
MACHINE=raspberrypi-rdk-hybrid source meta-cmf-raspberrypi/setup-environment
bitbake rdk-generic-hybrid-wpe-image
Hybrid Gateway with operator Ref.App
MACHINE=raspberrypirdkhybrefapp source meta-cmf-raspberrypi/setup-environment
bitbake rdk-generic-hybrid-refapp-image
IP Client
MACHINE=raspberrypi-rdk-ipmc source meta-cmf-raspberrypi/setup-environment
bitbake rdk-generic-ipclient-image
The generated image resides under the directory build-<MACHINE>/tmp/deploy/images/<MACHINE> of the Yocto workspace
How to flash
For flashing the image using linux environment use dd command
# Insert the micro SD card and mention the card's device file name
# input file (if) is the image file to flash and the output file (of) is the card's device file name
$sudo dd if=<path to ImageName.Rpi-sdimg> of=<path to SD card space> bs=4M
#Example:
$sudo dd if=rdk-generic-mediaclient-wpe-image.Rpi-sdimg of=/dev/sdb bs=4M
149+0 records in
149+0 records out
624951296 bytes (625 MB) copied, 39.7752 s, 15.7 MB/s
For Flashing the image using BalenaEtcher in windows follow below steps
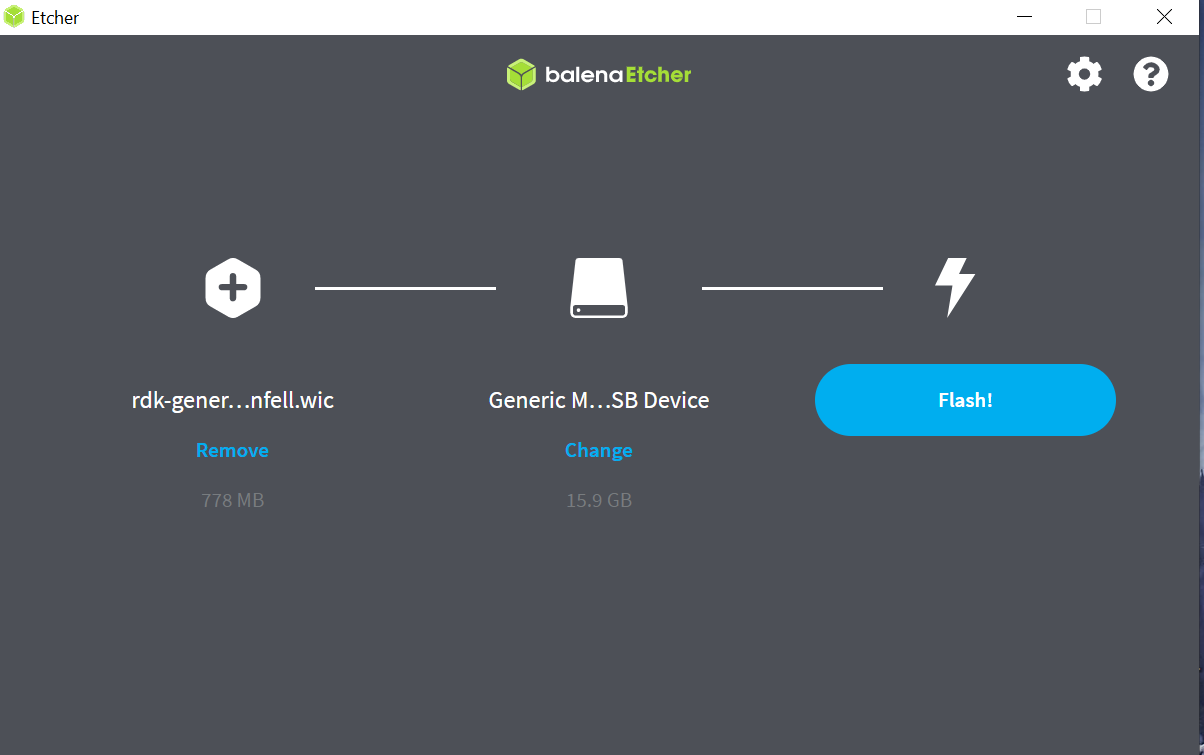
To flash the image on an SD card, you will need to download the balenaEtcher application-https://www.balena.io/etcher/
*Note: Prefer to use a 32GB sd card and there should be a minimum of 12GB of free space available in the device. Be sure to remove all other portable flash drives/hard drives/SD cards from your computer before flashing the RDK image
- Open the application
- Select the image from your download folder
- Select the drive containing your SD card
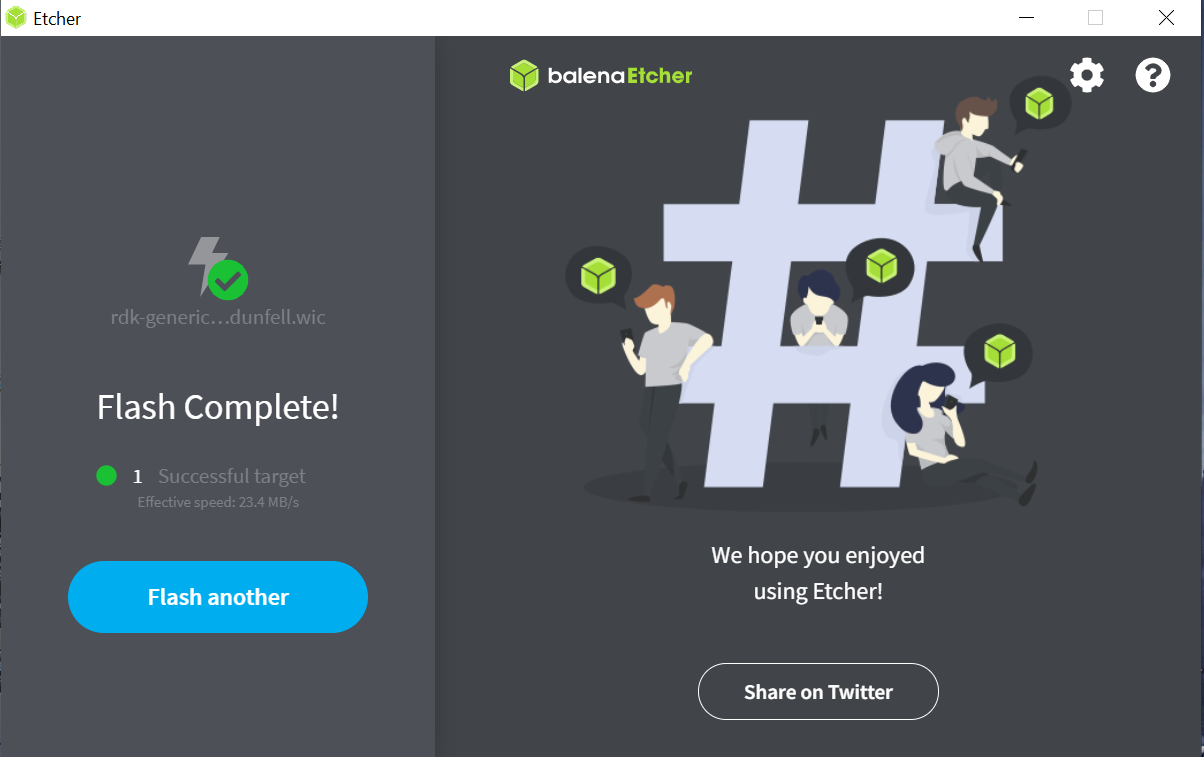
- Click “Flash” to copy the image onto the SD card
Bring up and operate
Once image flashing is done, remove the SD card from the device/laptop and insert the SD card into the microSD card slot on the underside of your Raspberry Pi.
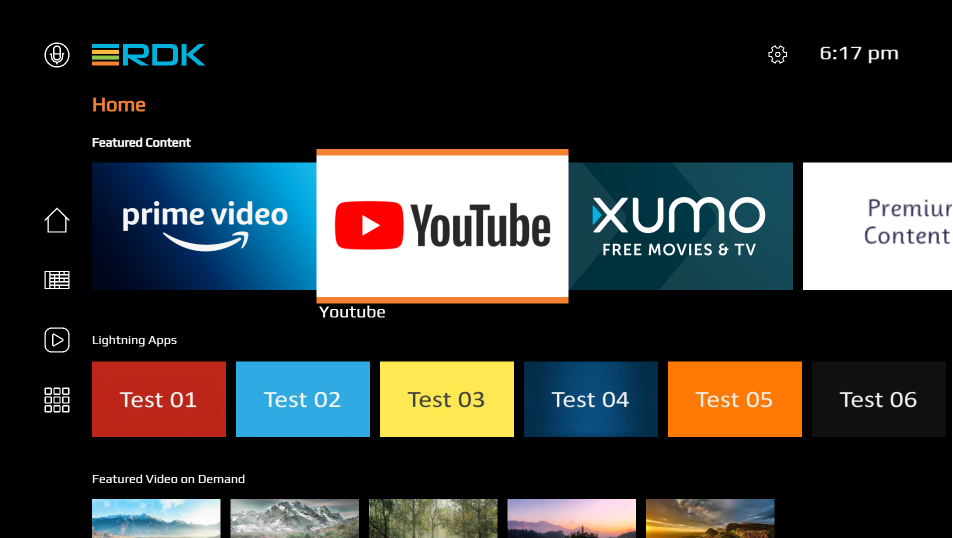
Power on the RPI and Bring up the device.
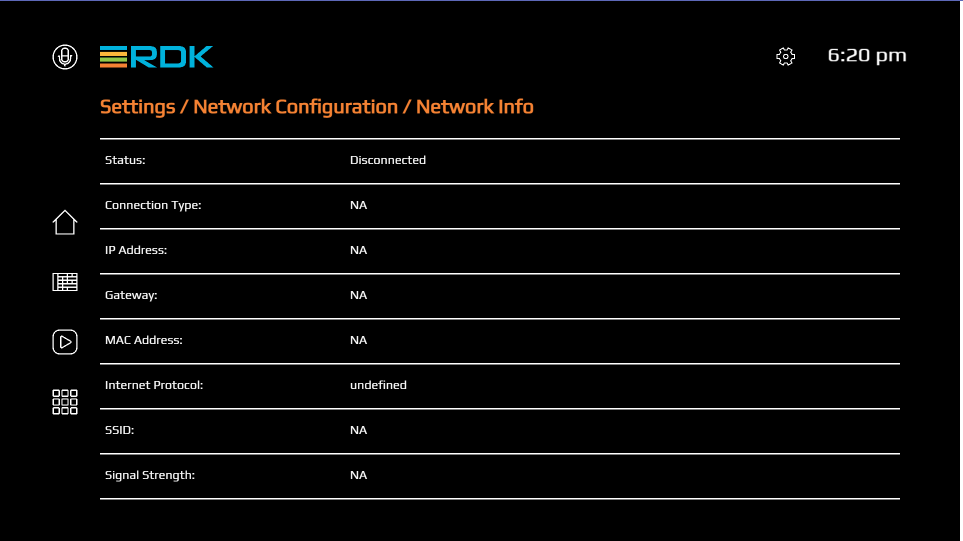
TV screen will display the default RDK UI as shown below.
-
How to navigate UI:
- Use Left/Right/Up/Down Keys to “move between the contents tiles”
- Use Enter Key to “Navigate between settings screen”
- Use backspace Key to “go back”
-
- To view the Raspberry Pi’s IP address(referred as machineIP from now), Go to ‘Settings → Network Configurtion → Network Info → see for ‘IP Address”
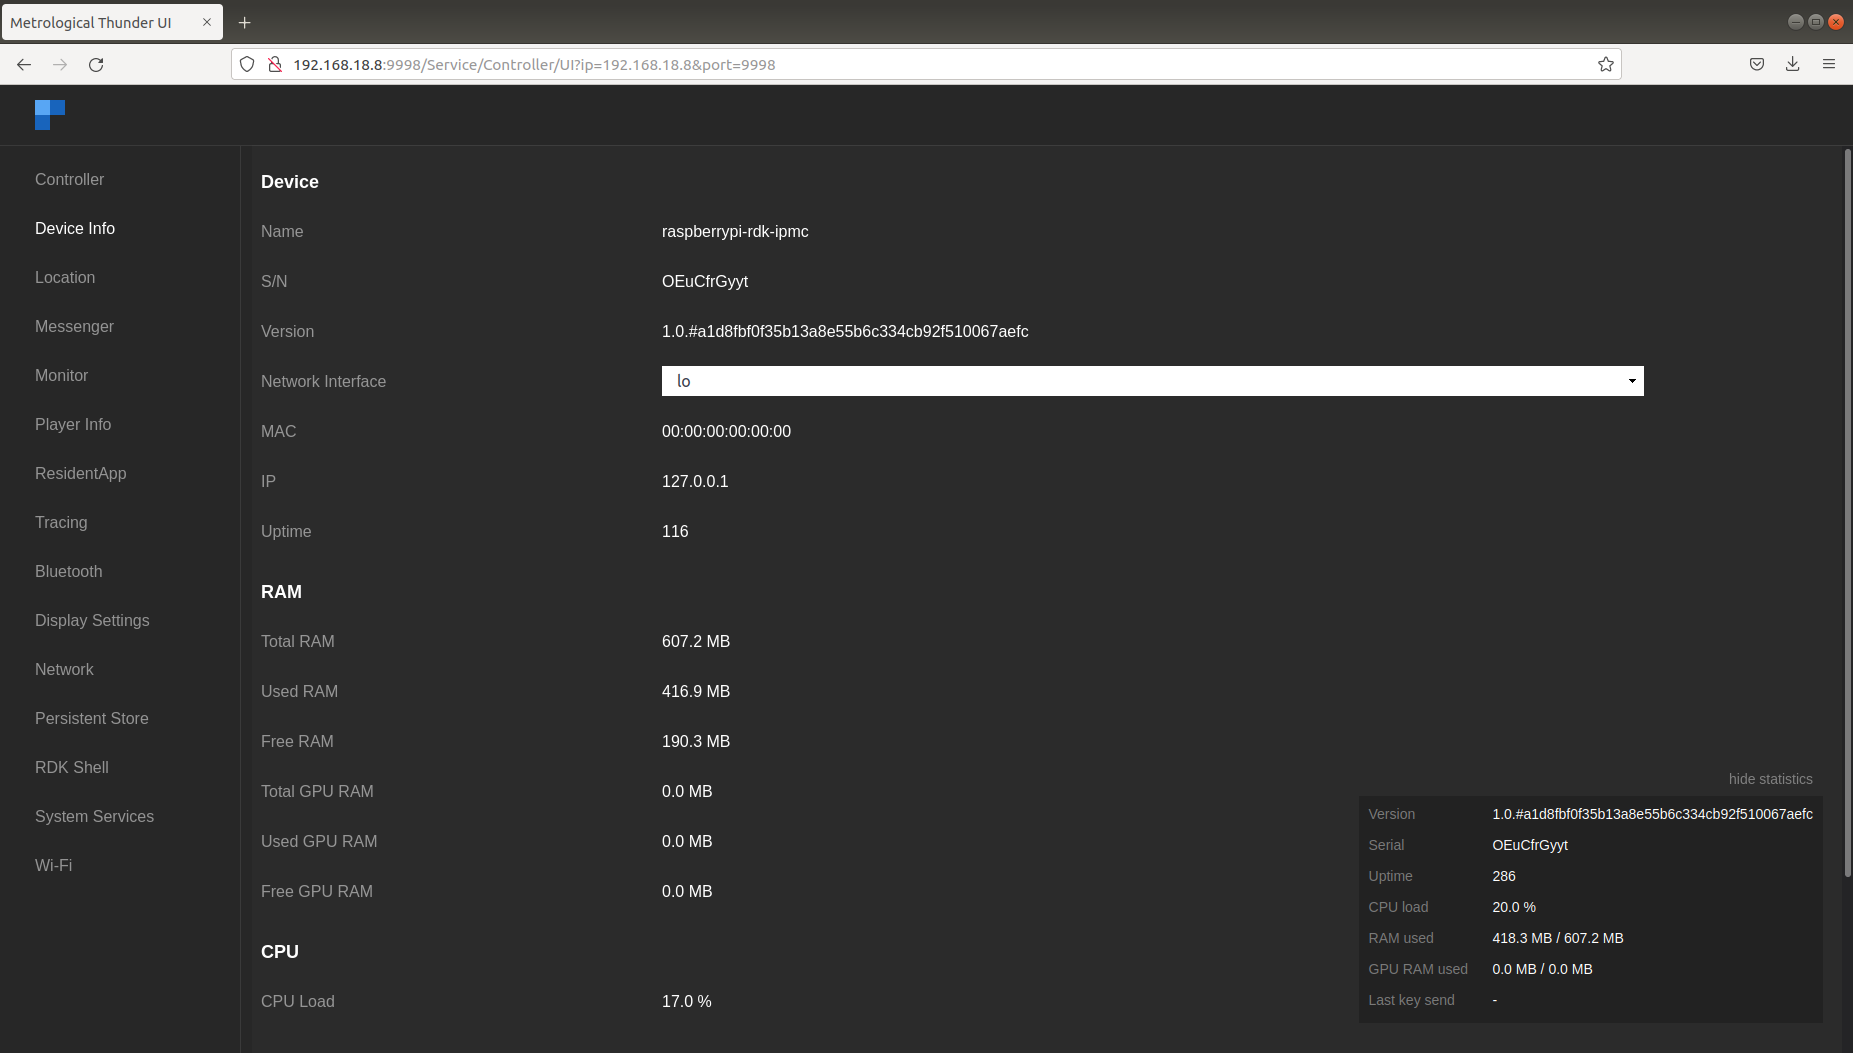
Accessing Raspberry Pi
-
For connecting Controller UI, use URL: http://<machineIP>:9998
-
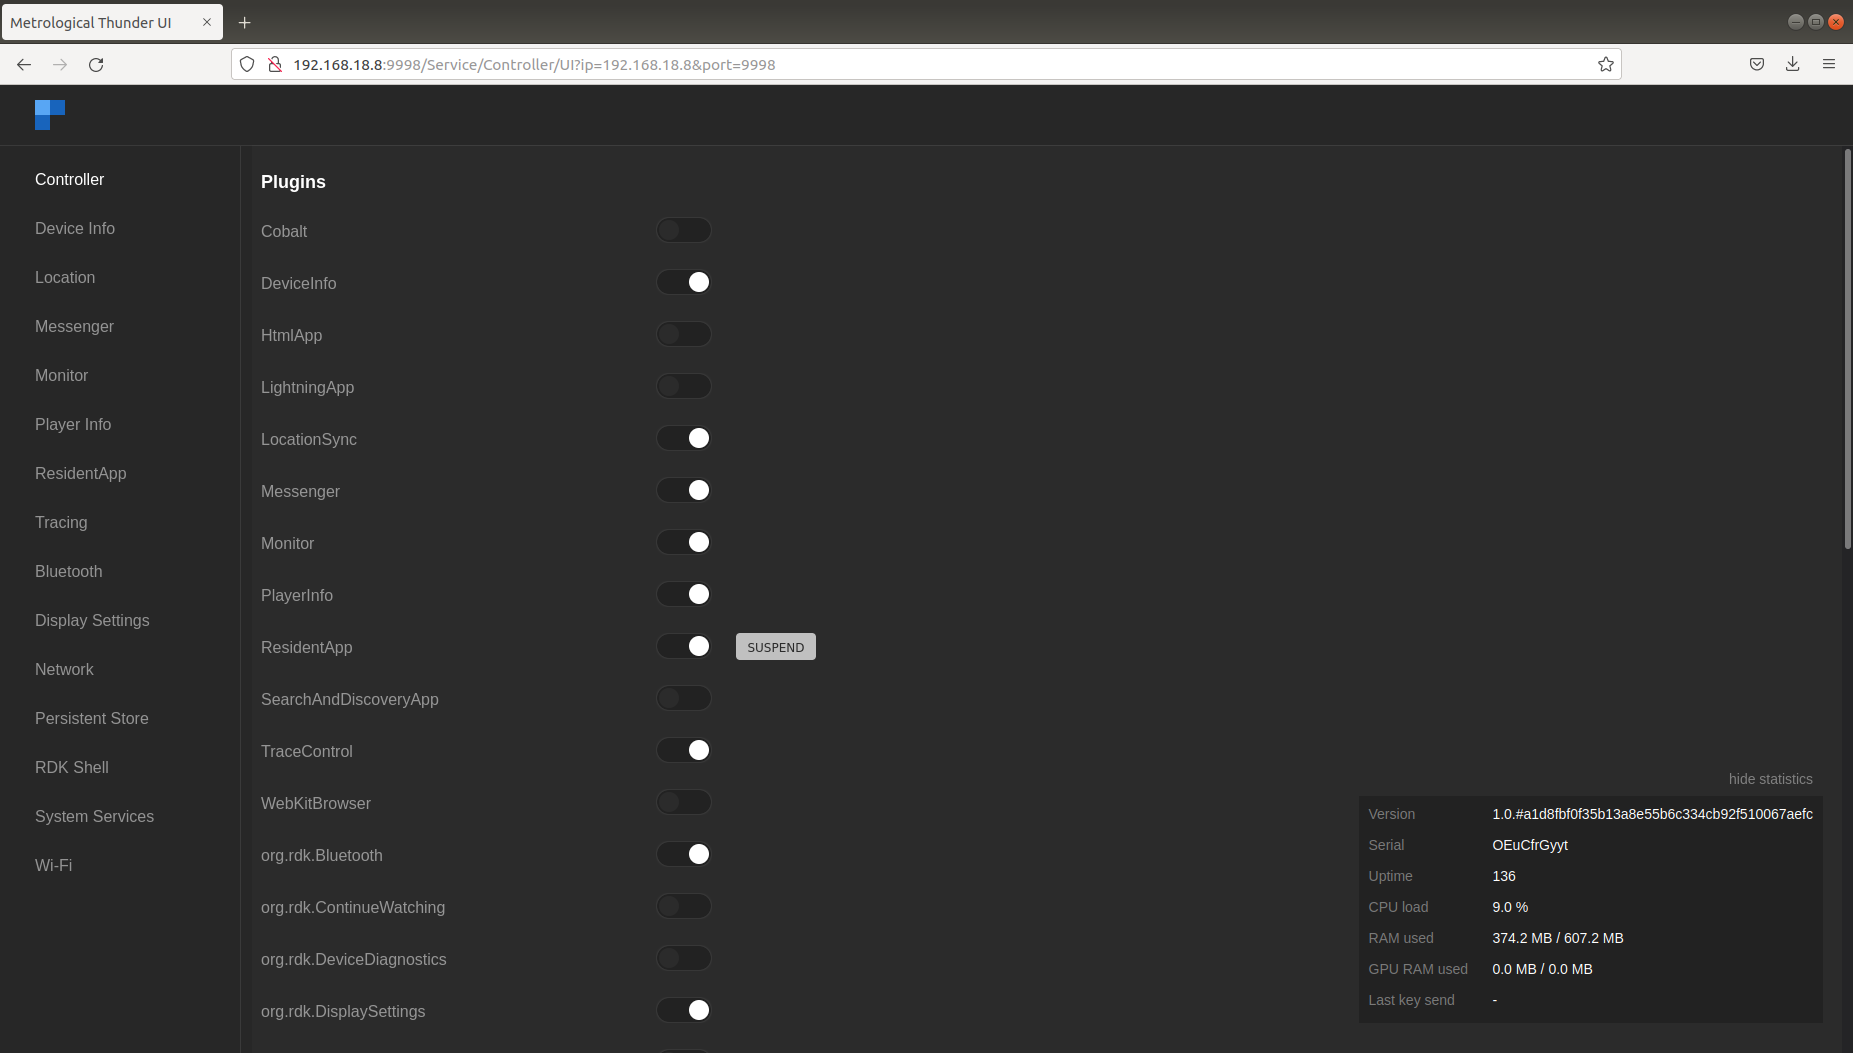
Plugins can be enabled or disabled from the controller UI.
-
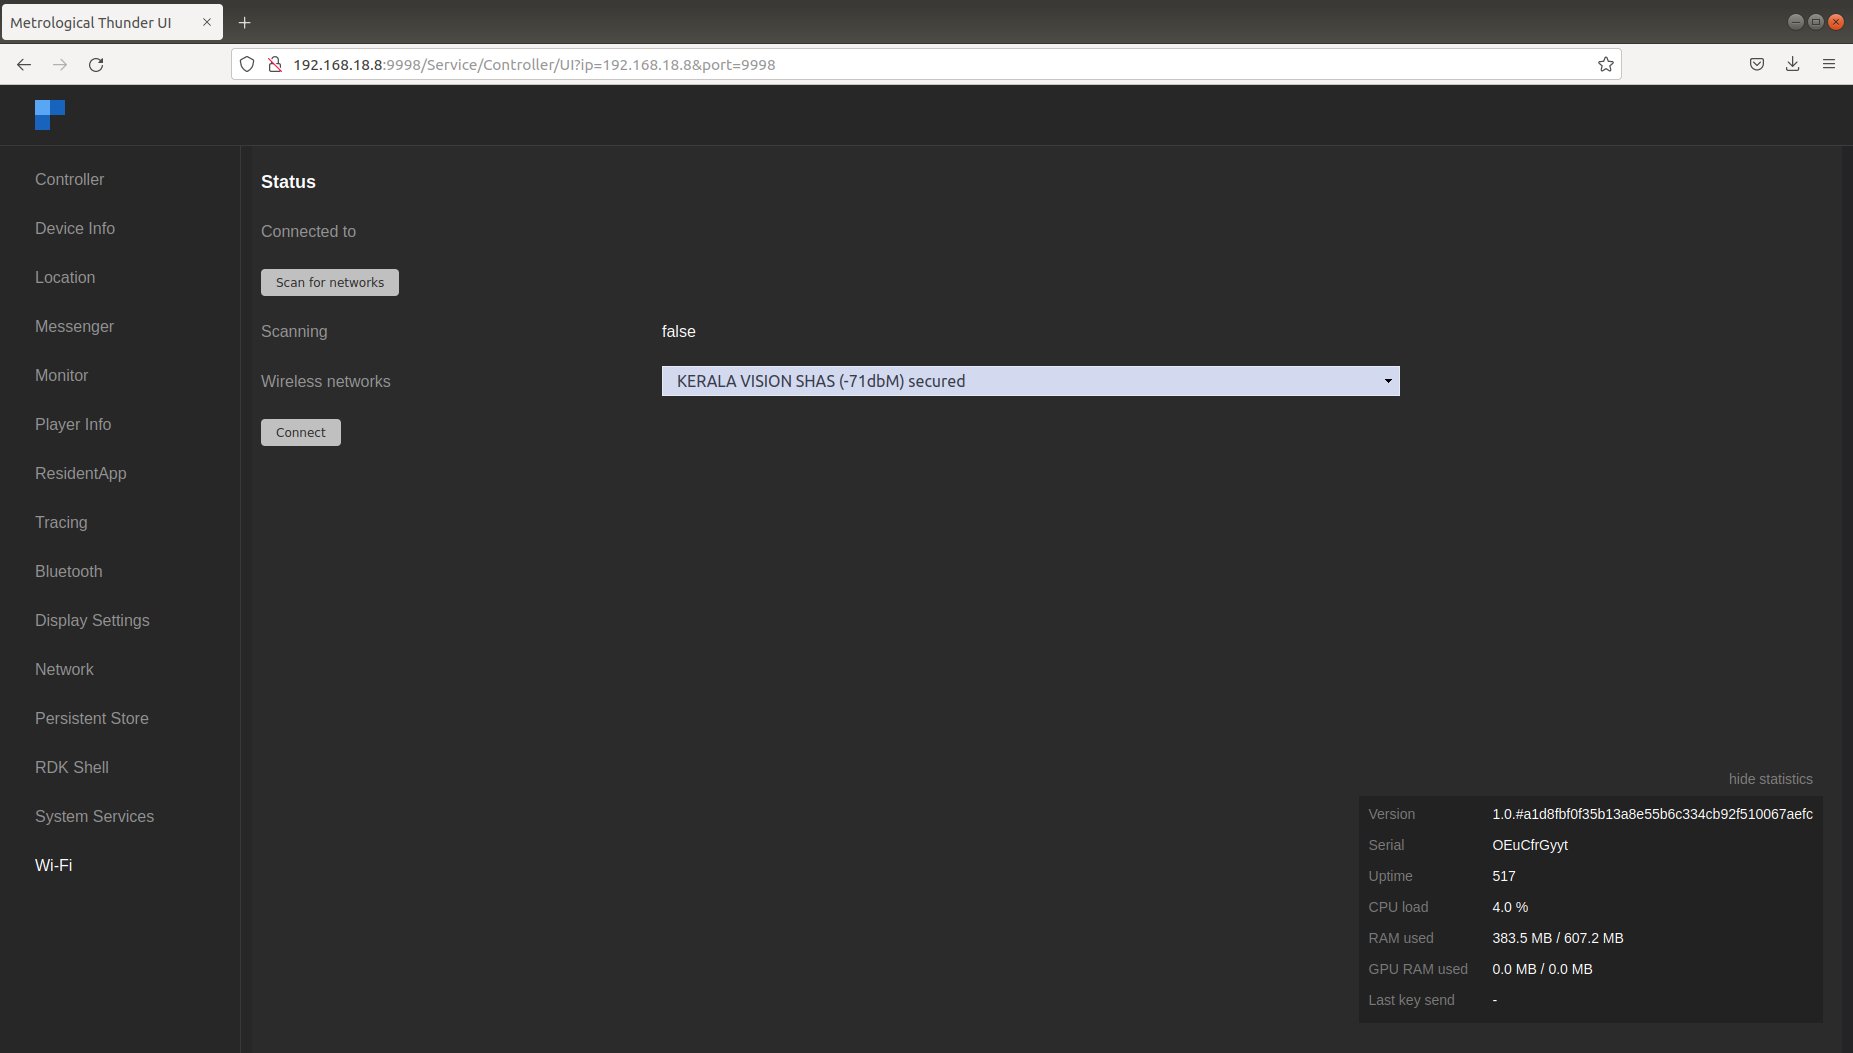
Wifi related services can be triggered from the Wi-Fi tab in the controller UI. We can scan and select from available networks.
-
For ssh, we can use ssh root@machineip
-
For verifying the image details, we can use cat /version.txt command.
cat /version.txtroot@raspberrypi-rdk-ipmc:~# cat /version.txt imagename:rdk-generic-ip-stb-client_rdk-next_20210902101930 BRANCH=rdk-next YOCTO_VERSION=dunfell VERSION=4.09.02.21 SPIN=0 BUILD_TIME="2021-09-02 10:19:30" Generated on Thu Sep 02 10:19:30 UTC 2021 root@raspberrypi-rdk-ipmc:~#
Further links
RDK-B
Overview
Raspberry PI(RPI) for RDK-B supports Morty and Dunfell Builds. Variety of Images based on requirement can be build for RPI such as Media Client, Media Gateway hybrid, and IP Client STB. Raspberry Pi 3B,Raspberry Pi 3B+, and Raspberry Pi 4B device versions are supported for RDK Stack.
How to build
Setting up the Host Environment
Pre-Requisites
|
Requirement |
Yocto 2.2 (Morty) |
Yocto 3.1 LTS (Dunfell) |
|---|---|---|
|
Linux |
32/64 bit Ubuntu 16.04 LTS Precise supported distributions and versions are here |
64 bit Ubuntu 18.04 LTS Precise supported distributions and versions are here |
|
Free HDD Space |
Minimum 100GB Free Memory |
Minimum 100GB Free memory space |
|
Oracle Virtual Box |
5.0.40 or higher |
– |
|
Wireless Adapter |
Brand Name: Tenda ralink & Model Number:W311MI TP-Link Archer T4U AC 1200 |
– |
|
USB to Ethernet Switch |
To connect with Ethernet Switch & Multiple Clients |
|
| Host Tools version |
|
|
Install the following packages for setting up your host VM
The instructions provided below are meant to be executed via the command line on an Ubuntu machine
For Morty:
# essential packages installation
# super user mode is required

# major essential packages
sudo apt-get install gawk wget git-core diffstat unzip texinfo gcc-multilib g++-multilib build-essential chrpath socat bison curl
# supportive packages

sudo apt-get install libfile-slurp-perl libncurses-dev autoconf flex doxygen libtool automake libpcre3-dev zlib1g-dev libbz2-dev subversion minicom putty libssl-dev rpm python-pexpect python-svn python-argparse vim tofrodos meld dos2unix cmake uuid-dev ruby transfig libglib2.0-dev xutils-dev lynx-cur gperf autopoint python-dulwich python-dev openjdk-7-jre
Note : Please note openjdk-7-jre package is not available for Ubuntu-16.04 anymore. Presumably openjdk-8-jre should be used instead.
For Dunfell:
# essential packages installation
# super user mode is required

$ sudo apt-get install gawk wget git-core diffstat unzip texinfo gcc-multilib
  build-essential chrpath socat cpio python python3 python3-pip python3-pexpect
  xz-utils debianutils iputils-ping python3-git python3-jinja2 libegl1-mesa libsdl1.2-dev
  pylint3 xterm bmap-tools

$ sudo apt-get install git cmake autoconf texinfo openjdk-8-jdk openjdk-8-jre
  m4 libtool libtool-bin curl pkg-config lib32z1 doxygen
Configure bash as default command interpreter for shell scripts
sudo dpkg-reconfigure dash
Select “No”
To choose bash, when the prompt asks if you want to use dash as the default system shell – select “No”
Configure Git
Upgrade your Git version to 1.8.x or higher
On Ubuntu 16.04 LTS, if you are unable to upgrade your git version using apt-get, then follow the below steps in order to upgrade
sudo apt-get install software-properties-common
sudo add-apt-repository ppa:git-core/ppa
sudo apt-get update
sudo apt-get install git
Once git is installed, configure your name and email using the below commands
# review your existing configuration
git config --list --show-origin

# configure user name and email address
git config --global user.name "John Doe"
git config --global user.email johndoe@example.com

# configure git cookies. Needed for Gerrit to only contact the LDAP backend once.
git config --global http.cookieFile /tmp/gitcookie.txt
git config --global http.saveCookies true
Configure repo
In order to use Yocto build system, first you need to make sure that repo is properly installed on the machine:
# create a bin directory
mkdir ~/bin
export PATH=~/bin:$PATH

# Download the repo tool and ensure that it is executable
curl http://commondatastorage.googleapis.com/git-repo-downloads/repo > ~/bin/repo
chmod a+x ~/bin/repo
Credential configuration
Note: it is also recommended to put credentials in .netrc when interacting with the repo.
A sample .netrc file is illustrated below
|
machine code.rdkcentral.com login <YOUR_USERNAME> password <YOUR_PASSWORD> |
|---|
Yocto 2.2 – Morty’s build environment and image build steps
$ mkdir <your workspace directory>
$ cd <your workspace directory>
$ repo init -u https://code.rdkcentral.com/r/manifests -b rdk-next -m rdkb-extsrc.xml
$ repo sync -j4 --no-clone-bundle
$ source meta-cmf-raspberrypi/setup-environment (Select option raspberrypi-rdk-broadband.conf)
$ bitbake rdk-generic-broadband-image
On Successful build, The kernel Image and root filesystem will be created under the below path, ~/tmp/deploy/images/raspberrypi-rdk-broadband folder
Yocto 3.1 – Dunfell’s build environment and image build steps
For RPI 3B/3B+ Model Reference Platform:
$ mkdir <workspace dir>
$ cd <workspace dir>
$ repo init -u https://code.rdkcentral.com/r/manifests -b dunfell -m rdkb-extsrc.xml
$ repo sync -j`nproc` --no-clone-bundle
$ MACHINE=raspberrypi-rdk-broadband source meta-cmf-raspberrypi/setup-environment
$ bitbake rdk-generic-broadband-image
For RPI 4B Model Reference Platform:
$ mkdir <workspace dir>
$ cd <workspace dir>
$ repo init -u https://code.rdkcentral.com/r/manifests -b dunfell -m rdkb-extsrc.xml
$ repo sync -j`nproc` --no-clone-bundle
$ MACHINE=raspberrypi4-rdk-broadband source meta-cmf-raspberrypi/setup-environment
$ bitbake rdk-generic-broadband-image
How to flash
For RPI 3B/3B+ Model Reference Platform, following command can be used to flash the RPI image to sd card using linux machine . dd tool should be available in linux
# Insert the micro SD card and mention the card's device file name
# input file (if) is the image file to flash and the output file (of) is the card's device file name
$sudo dd if=<path to ImageName.Rpi-sdimg> of=<path to SD card space> bs=4M
#Example:
$sudo dd if=rdk-generic-mediaclient-wpe-image.Rpi-sdimg of=/dev/sdb bs=4M
149+0 records in
149+0 records out
624951296 bytes (625 MB) copied, 39.7752 s, 15.7 MB/s
For Flashing the image using BalenaEtcher in windows follow below steps:
To flash the image on an SD card, you will need to download the balenaEtcher application-https://www.balena.io/etcher/
*Note: Prefer to use a 32GB sd card and there should be a minimum of 12GB of free space available in the device. Be sure to remove all other portable flash drives/hard drives/SD cards from your computer before flashing the RDK image
- Open the application
- Select the image from your download folder
- Select the drive containing your SD card
- Click “Flash” to copy the image onto the SD card
For RPI 4B Model Reference Platform, following command can be used to flash the RPI image to sd card using linux machine . bmap tool should be available in linux
bzip2 -d <path to ImageName.wic.bz2>
sudo -E bmaptool copy --nobmap <path to ImageName.wic> <path to SD card space>

Example:

$ bzip2 -d rdk-generic-broadband-image-raspberrypi-rdk-broadband.wic.bz2
$ sudo -E bmaptool copy --nobmap rdk-generic-broadband-image-raspberrypi-rdk-broadband.wic /dev/sdb
Bring up and operate
System Setup
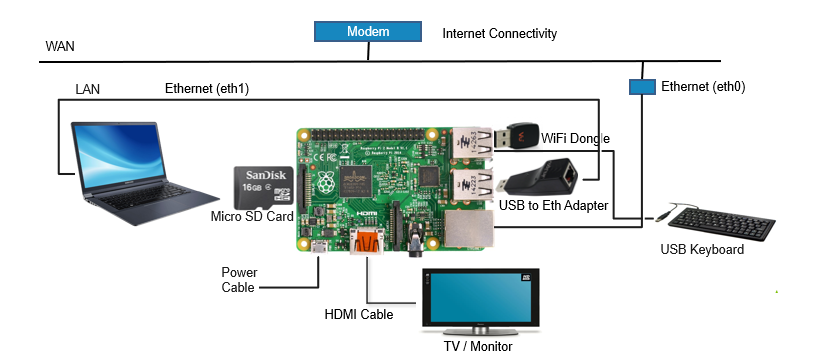
- Connect TV/Monitor to HDMI Video Output.
-
Connect Ethernet cable to ETH port.
- The other end of the Ethernet cable should be connected to the network where DHCP server is running so that the Raspberry Pi device gets assigned an IP address on boot-up.
- Connectivity to Internet is required so that the client connected can access the internet via RDK-B gateway.
3.Connect USB-Ethernet adapter to one of the USB slots present in Raspberry Pi.
4.Connect Ethernet cable from USB-Ethernet adapter to the client device/machine.
5.Insert the SD card into Micro SD Card Slot.
6.Connect Power cable to Micro USB power Input.
- Type “root” when the login prompt is displayed
- Run following in the terminal
# ifconfig - Check the interface shown for USB-Ethernet adapter. e.g eth1, eth2 … so on
- In case you are running in Ethernet mode, add interface of USB-Ethernet adapter in file “/etc/utopia/system_defaults. Change lan_ethernet_physical_ifnames. It will be your lan side.
e.g:lan_ethernet_physical_ifnames=eth1 - Reboot the Raspberry Pi
WebUI
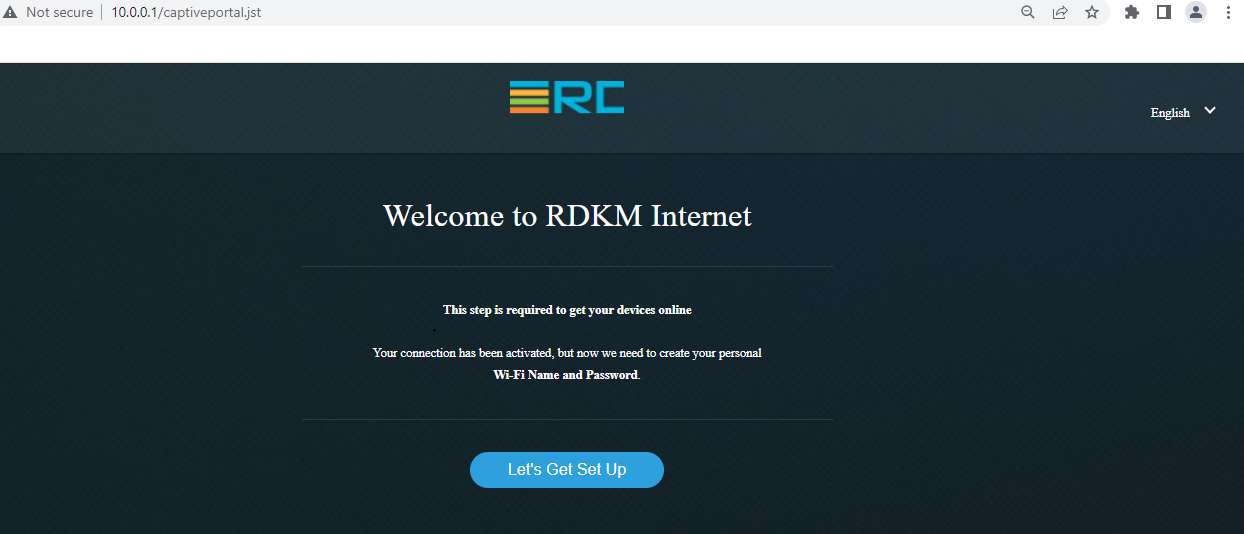
WebUI can be accessed by both the LAN clients and from the WAN Side.
-
For LAN Clients:
- Open an internet browser on the Lan client/machine.
-
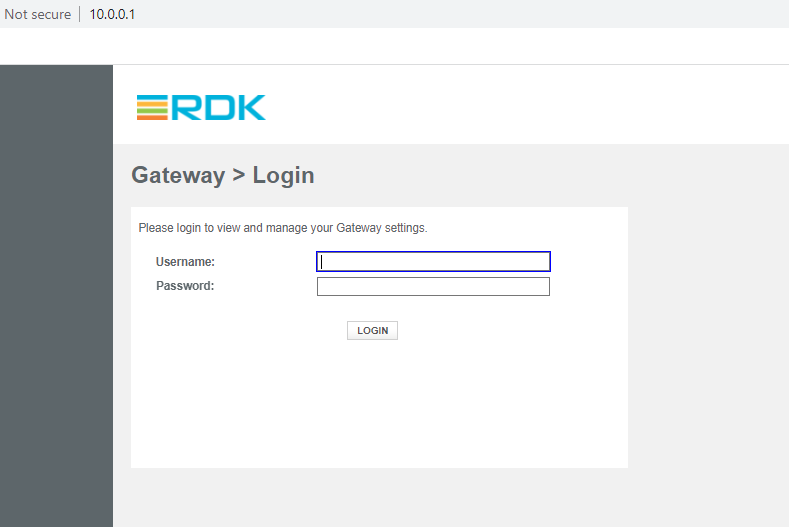
Give the following url in the browser window:
- From LAN Side:http://10.0.0.1–if we use LAN ip (10.0.0.1) then it opens captive portal page
-
-
-
From WAN Side:
-
http://<WAN IP Address of Raspberry Pi>:8080
-
For e.g http://10.213.51.122:8080
-
if you use erouter0 IP, then it opens admin page
-
-
-